
Photons Be Free.
First up thanks to Banggood for sending me the screen for this project – you can grab one here!

I’ve always liked the idea of holograms and while we are quite far away from having full on Star Trek holodecks, there are some cool things that can be done in the 21st.
So a while back Banggood contacted me and asked me if I wanted to do a project, I had a browse through the store and saw the above 800×480 screen and remembered I had a holographic pyramid laying around and came up with an idea for the HoloCube!
You can also catch this on my Hackster profile.
Key Goals.
- Have a ‘cube’ able to display a holographic real-time 3D image.
- Ensure that the 3D image being displayed can be viewed from different angles depending on the side of the cube.
- Have it be manipulable by hand movements/gestures using a Skywriter HAT.
Stuff.
- 5 Inch 800 x 480 HD TFT LCD Touch Screen
- Raspberry Pi 3
- Skywriter HAT
- Holographic Pyramid
- Jumper wires
- Standoffs/Screws
- Electrical Tape
- Blu Tack
- SD Card
The Build.
First up is unpacking the screen and Raspberry Pi:


And the onto the pyramid (constructed mine a while back, but it’s pretty easy – they come with instructions usually.):

Next up connect the Pi up to the screen via the GPIO and HDMI, using one of the included standoffs included with the screen to give it a bit of stability on the opposite side of where the HDMI bridge goes:


Now to attach the Skywriter HAT it has to be connected by soldered in wires, as all the GPIO is being physically taken up by the screen – handily, the screen has a GPIO breakout:

With some pre-soldering done on the necessary pins – you can grab the pinout for the Skywriter HAT here.
Now to cut some jumper wires ready to be soldered on:

And on they go:


And plugged into the HAT itself and as above you can see I’ve reinforced the connection to the HAT with some Blue Tack.
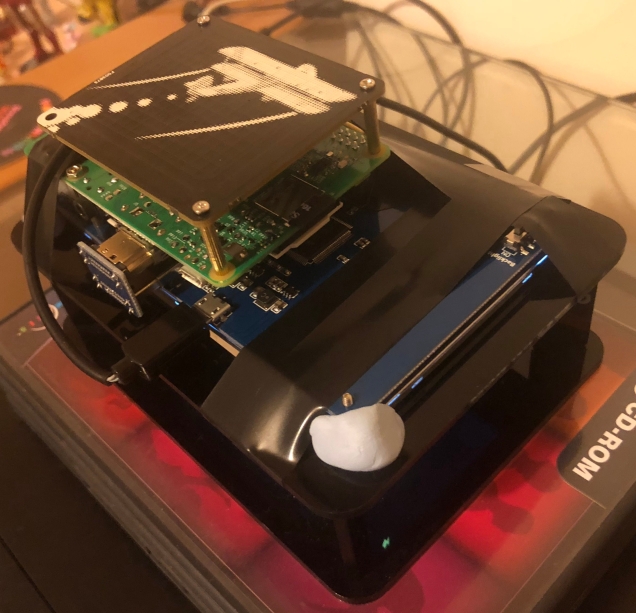
I then put the HAT over the Pi and used the remaining standoffs included with the screen to mount it onto the back of the Pi:

Now its time to boot it up and give it a test! Load up PiBakery and install the basics, set a hostname, password, etc. Nothing special.
Boot the Pi up by plugging a USB micro cable with power into the screen only and it should load up straight away onto the screen:
At this phase you may get some odd results as it may not recognise the screen and just be putting a 1080p image through it, so it may look a little blurry for now but we can fix that straight away.
Grab/copy my config file from my Github. And drag it over via WinSCP or similar to /boot/ and give the Pi a reboot. It should now be running at the native resolution of the screen and look super crisp!
Follow the instructions here to install Pi3D which is what is required to render the 3D imagery.
It was while browsing the Pi3D demos I came up with a good idea for what could be projected onto the Pyramid – a molecule! There is a demo file I modified (thanks to some searching around the internet for tips on how to do this) to generate the effect required for the pyramid as well as enable the molecule to be moved around with the mouse – this can also be grabbed from my Github.

The final part is to install the software for the Skywriter HAT, this can be done with one line:
curl -sS get.pimoroni.com/skywriter | bashand following the instructions that come up.
In order to get the mouse movement working I had to edit the mouse.py file under the examples – I couldn’t get autopy to install on Stretch for some reason – the modified file that uses uinput is again, on my Github.
Follow the instructions here to install uinput for python.
Uinput will also need to be added to the Kernel modules:
sudo nano /etc/modules

-and add-

uinput
Save the file, now grab rc.local from the above Github link and put it into
/etc/
overwriting the existing one and reboot to enable.
The Pi should now boot and be displaying the molecule on the screen and should be able to be rotated by hand movements around the Skywriter.
Finally the screen and Pi need to be placed over the pyramid, aligned just right and taped down with some additional Blue Tack to hold down the corners:

Results.
I was very happy with the screen provided, it has a really clear screen and is so easy to set up – as well as being the perfect size for the project!

I didn’t use the touchscreen functionality with it, but software for this is included in the box, along with a stylus.
The other great thing about it is; you can plug power into the screen and it will power both it and the Pi with one cable.
It’s very cool moving the image about with hand gestures and being able to view the different sides of the molecule from each side almost as if it’s a real object floating in there.


And of course a video covering the usage of the hand movements and a general showcase: https://youtu.be/OlfggkPnAm8
Possibilities.
With a much a larger screen and some more advanced use of hand gestures this could possibly be utilised in some handy ways – I know the whole holo-pyramid thing is nothing new; but I can imagine it being useful to be able to actively look around and move an object in a space like this, especially molecules and other such things.
The ability to move around and see the sides/back of the object at the same time (with different people observing) and on top of that be able to move it with no physical contact offers more than just simply viewing on a standard screen and using a KB/mouse.
I also thought about the possibility of adding in voice commands – switching to different objects, shutting the Pi down etc. I may make a version 2.0 that uses a full sized monitor with a large pyramid withe some voice rec.
Cybernetic Oblivion.
Let me know what you thought of this project!
Feel free to use anything in the project to improve it and make your own, or let me know anything I could have done better.
I certainly enjoyed getting to grips a bit with Pi3D and hope to utilise it some more in future, I’ve also had some inspiration for more projects in future so keep an eye out!
And thanks again to Banggood!

